Object identification in Python

Object detection is crucial in autonomy and manufacturing for enhancing efficiency, safety, and precision. In autonomous systems like vehicles or robots, it enables real-time navigation, obstacle avoidance, and interaction with dynamic environments. In manufacturing, object detection facilitates automation by enabling machines to recognize, sort, and manipulate parts, improving quality control, productivity, and reducing human error.

Nominal has 1st class support for video ingestion, analysis, time sychronization across sensor channels, and automated checks that signal when a video feature is out-of-spec.

Connect to Nominal

Get your Nominal API token from your User settings page.

See the Quickstart for more details on connecting to Nominal from Python.

1import nominal.nominal as nm
2
3nm._config.set_token(
4 url = 'https://api.gov.nominal.io/api',
5 token = '* * *' # Replace with your Access Token from
6 # https://app.gov.nominal.io/settings/user?tab=tokens
7)
If you’re not sure whether your company has a Nominal tenant, please reach out to us.

Download video files

1dataset_repo_id = 'nominal-io/drone-flight-object-identification'
2dataset_filename = 'all_scores_bounding_box_output.mov'

For convenience, Nominal hosts sample test data on Hugging Face. To download the sample data for this guide, copy-paste the snippet below.

1from huggingface_hub import hf_hub_download
2
3dataset_path = hf_hub_download(
4 repo_id=f"{dataset_repo_id}",
5 filename=f"{dataset_filename}",
6 repo_type='dataset'
7)
8
9print(f"File saved to: {dataset_path}")

(Make sure to first install huggingface_hub with pip3 install huggingface_hub).

Display video

If you’re working in Jupyter notebook, here’s a shortcut to display the video inline in your notebook.

1from ipywidgets import Video
2Video.from_file(video_path)

(For faster loading, only 20s of the full 225 MB video is shown above).

Inspect video metadata

After downloading the video, you can inspect its properties with OpenCV. Download OpenCV with pip3 install opencv-python.

1import cv2
2cap = cv2.VideoCapture(video_path)
3frame_count = int(cap.get(cv2.CAP_PROP_FRAME_COUNT))
4cap.release()
5
6print(f'Total number of frames: {frame_count}')
Total number of frames: 6591

Extracted CV data

For convenience, the computer vision (“CV”) features extracted from this video are available on Nominal’s Hugging Face.

RT-DETR, a pre-trained ML model, was used to generate this data. If you’re interested in how to extract computer vision data for your own video, please see the Appendix.

Let’s download and inspect this data.

1import polars as pl
2df_computer_vision = pl.read_csv('hf://datasets/nominal-io/drone-flight-object-identification/object_detection_metadata.csv')
3df_computer_vision.head().select(df_computer_vision.columns[:7])
frameobjectscorex_miny_minx_maxy_max
i64strf64f64f64f64f64
5”car”0.444338973.15350.761172.47369.04
5”car”0.403373433.44351.53531.85368.34
5”motorbike”0.351543298.63350.76438.73369.57
6”motorbike”0.40321308.95348.02437.47369.22
6”car”0.400091432.22349.05533.11367.95
1df_computer_vision.head().select(df_computer_vision.columns[7:12])
timestampstotal_object_countmotorbike_countcar_countperson_count
stri64i64i64i64
”2011-11-11T11:11:11.208333”3120
”2011-11-11T11:11:11.250000”6231

As you can see, each row of this table represents an object that the ML model (RT-DETR) identified.

Specifically, each row includes a label for the object identified, the video frame number, the object’s position within the frame, the video frame’s timestamp, and a count for all other objects identified in the same frame.

Let’s uplaod this data and video to Nominal for data review and automated check authoring.

Upload to Nominal

We’ll upload both the annotated video and extracted features dataset, then group them together as a Run.

In Nominal, Runs are containers of multimodal test data - including Datasets, Videos, Logs, and database connections.

To see your organization’s latest Runs, head over to the Runs page

Upload dataset

Since the extracted features CSV is already in a Polars dataframe, we can conveniently upload it to Nominal with the upload_polars() function.

1import nominal.nominal as nm
2
3dataset = nm.upload_polars(
4 df_computer_vision,
5 name='Computer Vision Features: Drone Festival Flight',
6 timestamp_column='timestamps',
7 timestamp_type='iso_8601',
8)
9
10print('Uploaded dataset:', dataset.rid)

Upload video

Similarly, we can upload the video file with the upload_video() convenience function.

Video upload requires a start time. If the start time of your video capture is not important, you can choose an arbitrary time like datetime.now() or 2011-11-11 11:11:11.

Since Nominal uses timestamps to cross-correlate between datasets, make sure that whichever start time you choose makes sense for the other datasets in the Run.

1import nominal.nominal as nm
2from datetime import datetime
3
4vid = nm.upload_video(
5 file = video_path,
6 name = 'Drone Festival Flight: RT-DETR model results',
7 start = datetime.strptime('2011-11-11 11:11:11', '%Y-%m-%d %H:%M:%S')
8)
9
10vid.rid

Create an empty Run

In Nominal, Runs are containers of multimodal test data - including Datasets, Videos, Logs, and database connections.

To see your organization’s latest Runs, head over to the Runs page

Set the Run start and end times with minimum and maximum values from the timestamp column.

1import nominal.nominal as nm
2
3computer_vision_run = nm.create_run(
4 name = 'RT-DETR model analysis',
5 start = df_computer_vision['timestamps'].min(),
6 end = df_computer_vision['timestamps'].max(),
7 description = 'Run analysis of RT-DETR model output on single drone flight footage.',
8)
9
10computer_vision_run

Add dataset & video to Run

Add the video file and feature dataset to the Run with Run.add_datasets().

1computer_vision_run.add_datasets(
2 datasets = dict(
3 rt_detr_metadata = dataset.rid,
4 rt_detr_video = vid.rid
5 )
6)

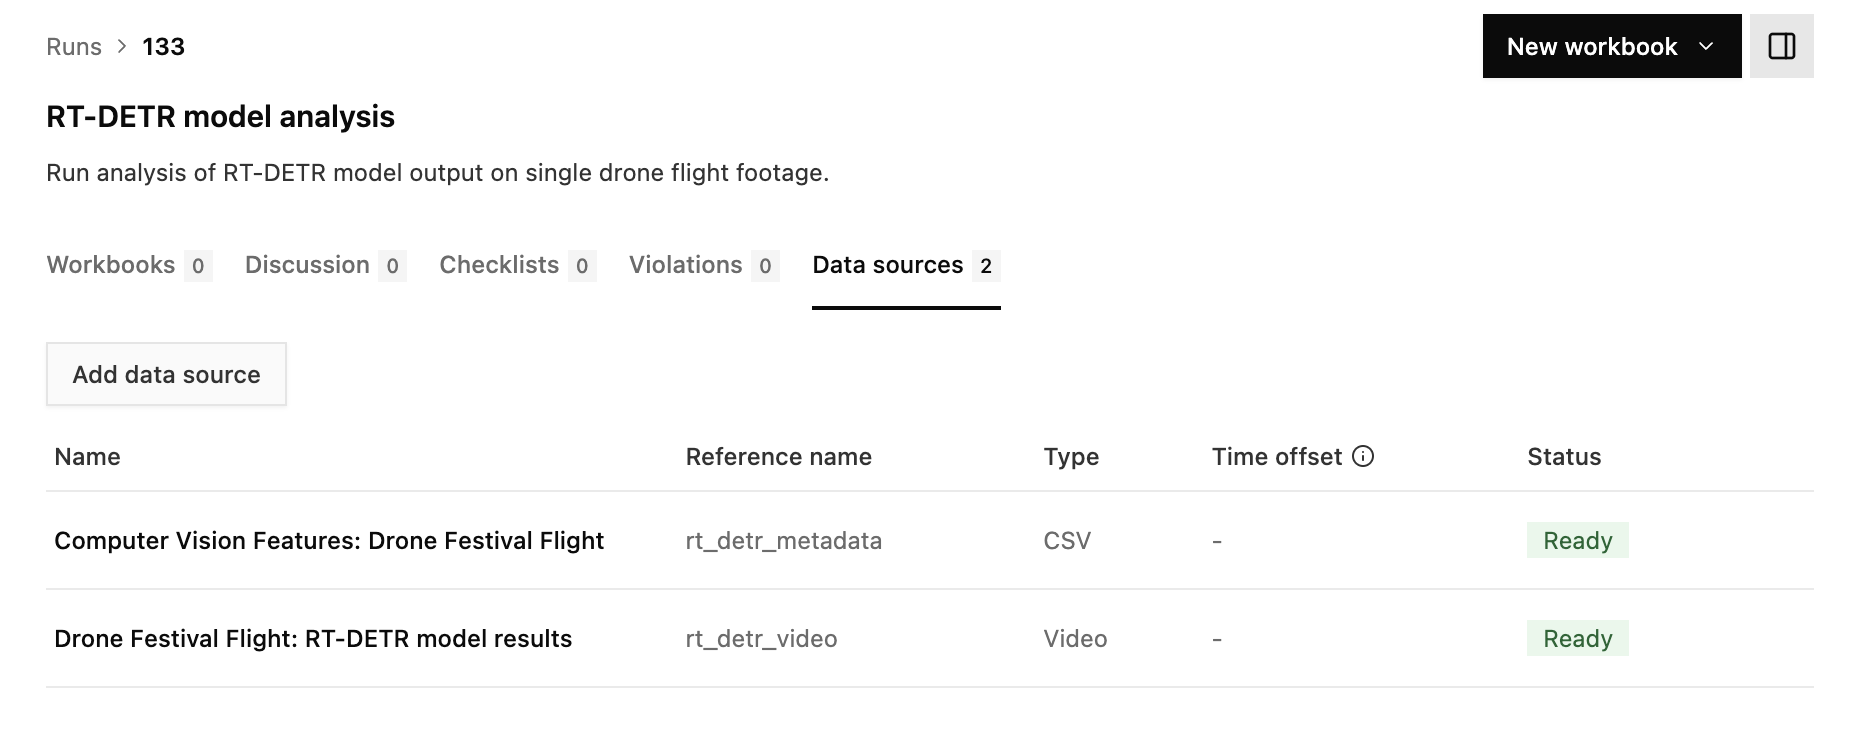
On the Nominal runs page, click on “RT-DETR model analysis” (login required). If you go to the “Data sources” tab of the run, you’ll now see the Video and CSV file associated with this run:
run-datasources

Create a workbook

Now that your data is organized in a Run, it’s easy to create a Workbook for ad-hoc analysis on the Nominal platform.

This Workbook synchronizes the extracted feature data with the playback of the annotated video. Feature data like object count and ML model confidence score can be inspected frame-by-frame. Checks that signal anomalous behaviour can also be defined and applied to future video ingests.

Workbook link (Login required)
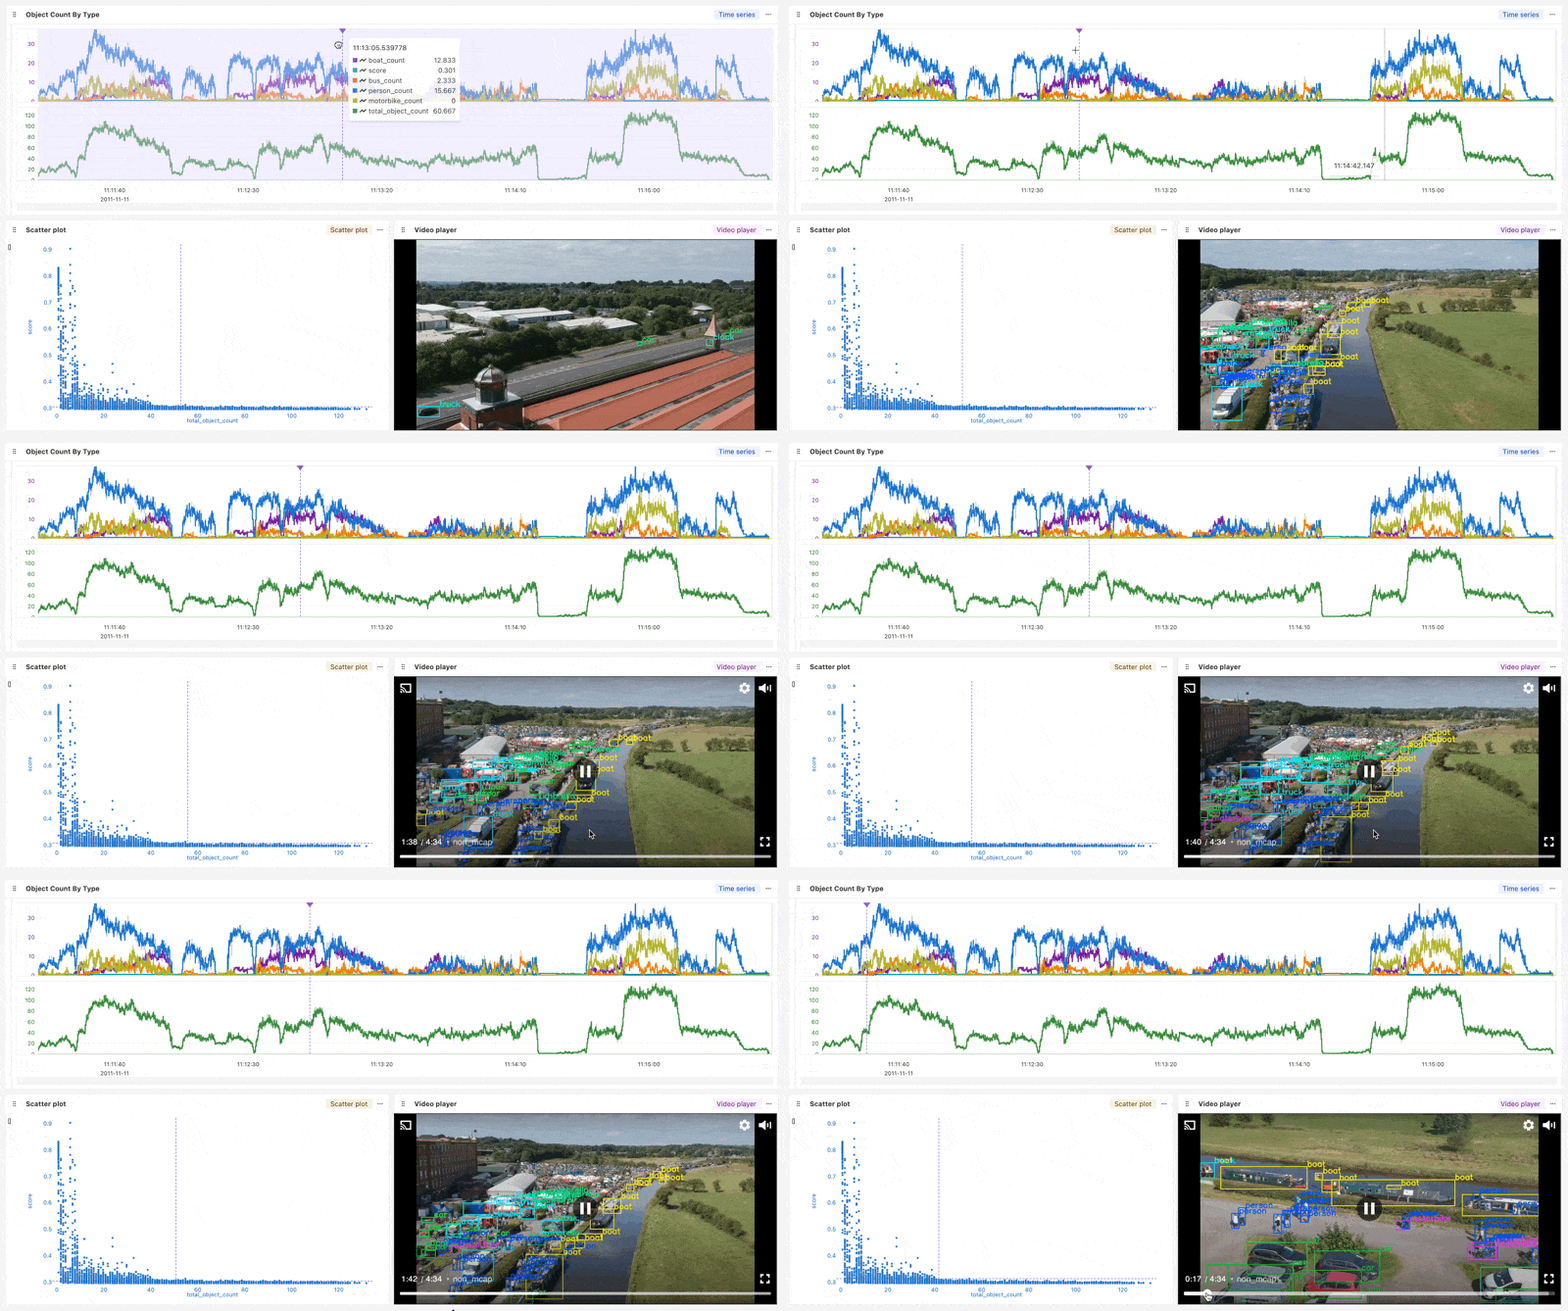
computer-vision-workbook

Appendix

This section outlines the general steps for applying a pre-trained ML model to a video. The model chosen is RT-DETR - an object identification model. Other types of ML image models can be applied as well (such as depth detection, temperature analysis, etc). Choose an ML model or video analysis technique that is most helpful for your hardware testing goals. Please contact our team if you’d like to discuss!

For automating the ingestion of computer vision artifacts in Nominal, please see the previous section.

Identify objects per frame

The function below takes a PIL image and returns a Polars dataframe with all of the objects in the image identified.

We’ll use this function to step through the video frame-by-frame and identify each object.

1import torch
2from PIL import Image
3from transformers import RTDetrForObjectDetection, RTDetrImageProcessor
4import polars as pl
5
6def get_objects_from_pil_image(image, frame):
7 '''
8 This function takes an image in PIL format and returns a Polars dataframe with all of the identified objects
9 '''
10 schema = {
11 "frame": pl.Int64, # Column 'frame' as integer
12 "object": pl.Utf8, # Column 'object' as string
13 "score": pl.Float64, # Column 'score' as float
14 "x_min": pl.Float64, # Column 'x_min' as integer
15 "y_min": pl.Float64, # Column 'y_min' as integer
16 "x_max": pl.Float64, # Column 'x_max' as integer
17 "y_max": pl.Float64 # Column 'y_max' as integer
18 }
19 df_video_frame = pl.DataFrame(schema=schema)
20
21 image_processor = RTDetrImageProcessor.from_pretrained("PekingU/rtdetr_r50vd")
22 model = RTDetrForObjectDetection.from_pretrained("PekingU/rtdetr_r50vd")
23
24 inputs = image_processor(images=image, return_tensors="pt")
25
26 with torch.no_grad():
27 outputs = model(**inputs)
28
29 results = image_processor.post_process_object_detection(outputs, target_sizes=torch.tensor([image.size[::-1]]), threshold=0.3)
30
31 for result in results:
32 for score, label_id, box in zip(result["scores"], result["labels"], result["boxes"]):
33 score, label = score.item(), label_id.item()
34 box = [round(i, 2) for i in box.tolist()]
35 new_row = pl.DataFrame({
36 "frame": [frame],
37 "object": [model.config.id2label[label]],
38 "score": [score],
39 "x_min": [box[0]],
40 "y_min": [box[1]],
41 "x_max": [box[2]],
42 "y_max": [box[3]]
43 })
44 df_video_frame = pl.concat([df_video_frame, new_row])
45
46 return df_video_frame

Step through video frames

The below script steps through each frame in the video and uses get_objects_from_pil_image() (see above) to identify each object. Each identified object is added as a row to the Polars dataframe df_video.

Depending on the length of your video, its resolution, and your machine, this script can take several hours to run. To process 30min of footage on an M3 Macbook, expect at least an hour.
1import cv2
2
3# Load the video
4cap = cv2.VideoCapture(raw_video_path)
5
6schema = {
7 "frame": pl.Int64, # Column 'frame' as integer
8 "object": pl.Utf8, # Column 'object' as string
9 "score": pl.Float64, # Column 'score' as float
10 "x_min": pl.Float64, # Column 'x_min' as integer
11 "y_min": pl.Float64, # Column 'y_min' as integer
12 "x_max": pl.Float64, # Column 'x_max' as integer
13 "y_max": pl.Float64 # Column 'y_max' as integer
14}
15
16df_video = pl.DataFrame(schema=schema)
17
18while cap.isOpened():
19 # Read the current frame
20 ret, frame = cap.read()
21
22 if not ret:
23 break
24
25 # Convert the OpenCV frame (BGR format) to a Pillow image (RGB format)
26 frame_rgb = cv2.cvtColor(frame, cv2.COLOR_BGR2RGB) # Convert BGR to RGB
27 pillow_image = Image.fromarray(frame_rgb)
28
29 current_frame = int(cap.get(cv2.CAP_PROP_POS_FRAMES))
30
31 frame_objects = get_objects_from_pil_image(pillow_image, current_frame)
32
33 df_video = pl.concat([df_video, frame_objects])
34
35# Release the video capture object and close all windows
36cap.release()
37
38print('Number of objects identified:', len(df_video))
Number of objects identified: 291558

In less than 5 minutes of video, the RT-DETR model identified almost 300k objects!

Enrich metadata

The scripts below add timestamp and object count columns to df_video.

Timestamp column

df_video only has a frame count column. This script adds a timestamp column and assigns each frame an absolute time (starting with ‘2011-11-11 11:11:11’ for the first frame).

Video start times are used to align playback with other time-domain data in your run. Whichever absolute start time that you choose for your video (for example, 2011-11-11 11:11:11), make sure that it aligns with the other start times in your run’s data sources.

1import cv2
2from datetime import datetime, timedelta
3import polars as pl
4
5frame_timestamp_dict = dict(timestamps = [], frame = [])
6
7# Load the video
8cap = cv2.VideoCapture(raw_video_path)
9
10# Get the video's frames per second (fps) to calculate frame duration
11fps = cap.get(cv2.CAP_PROP_FPS)
12frame_duration = 1000 / fps # Duration of each frame in milliseconds
13
14frame_number = 0
15date_string = '2011-11-11 11:11:11'
16start_timestamp = datetime.strptime(date_string, '%Y-%m-%d %H:%M:%S')
17
18# Read the video frame by frame and print the duration for each frame
19while cap.isOpened():
20 ret, frame = cap.read()
21
22 if not ret:
23 break
24
25 # Get the timestamp for the current frame
26 timestamp_ms = cap.get(cv2.CAP_PROP_POS_MSEC)
27 start_timestamp = timestamp + timedelta(milliseconds=timestamp_ms)
28 frame_timestamp_dict['timestamps'].append(new_timestamp)
29 frame_timestamp_dict['frame'].append(frame_number)
30
31 frame_number += 1
32
33# Release the video capture object
34cap.release()
35
36df_frame_timestamps = pl.DataFrame(frame_timestamp_dict)
37df_video_with_timestamps = df_video.join(df_frame_timestamps, on="frame")
38
39df_video_with_timestamps.head()

Object count

The script below adds columns that count each object per video frame. For example, if the boat_count column is 6, then 6 boats were identified in that frame.

1object_count_data = dict(
2 frame = [],
3 total_object_count = [],
4 motorbike_count = [],
5 car_count = [],
6 person_count = [],
7 boat_count = [],
8 bus_count = [],
9 truck_count = []
10)
11
12for frame_count in range(df_video_with_timestamps['frame'].max()):
13 df_single_frame = df_video_with_timestamps.filter(pl.col('frame') == frame_count)
14 object_count_data['frame'].append(frame_count)
15 object_count_data['total_object_count'].append(len(df_single_frame))
16 object_count_data['motorbike_count'].append(len(df_single_frame.filter(pl.col('object') == 'motorbike')))
17 object_count_data['car_count'].append(len(df_single_frame.filter(pl.col('object') == 'car')))
18 object_count_data['person_count'].append(len(df_single_frame.filter(pl.col('object') == 'person')))
19 object_count_data['boat_count'].append(len(df_single_frame.filter(pl.col('object') == 'boat')))
20 object_count_data['bus_count'].append(len(df_single_frame.filter(pl.col('object') == 'bus')))
21 object_count_data['truck_count'].append(len(df_single_frame.filter(pl.col('object') == 'truck')))
22
23df_object_count = pl.DataFrame(object_count_data)
24df_video_w_object_count = df_video_with_timestamps.join(df_object_count, on="frame")
25
26df_video_w_object_count.head()

Annotate video

Finally, the below script adds a color-coded bounding box and label to each object identified in each frame. The result is a fully annotated video.

1import cv2
2from IPython.display import clear_output
3
4neon_colors = {
5 'car': (57, 255, 20), # Neon Green
6 'boat': (0, 255, 255), # Neon Cyan
7 'pottedplant': (255, 0, 255), # Neon Magenta
8 'horse': (255, 215, 0), # Neon Gold
9 'cat': (255, 69, 0), # Neon Orange Red
10 'clock': (173, 255, 47), # Neon Green Yellow
11 'cow': (255, 105, 180), # Neon Pink
12 'bicycle': (0, 255, 0), # Neon Lime
13 'bird': (255, 20, 147), # Neon Deep Pink
14 'traffic light': (0, 255, 127),# Neon Spring Green
15 'umbrella': (127, 255, 0), # Neon Chartreuse
16 'kite': (255, 99, 71), # Neon Tomato
17 'truck': (255, 255, 0), # Neon Yellow
18 'person': (255, 69, 0), # Neon Orange
19 'parking meter': (0, 191, 255),# Neon Deep Sky Blue
20 'bus': (255, 215, 0), # Neon Gold
21 'train': (138, 43, 226), # Neon Blue Violet
22 'motorbike': (255, 0, 255), # Neon Magenta
23 'backpack': (255, 105, 180), # Neon Hot Pink
24 'dog': (0, 255, 0), # Neon Lime Green
25 'sheep': (255, 20, 147), # Neon Deep Pink
26 'stop sign': (255, 69, 0), # Neon Orange Red
27 'book': (57, 255, 20), # Neon Green
28 'aeroplane': (0, 255, 255), # Neon Cyan
29 'cell phone': (255, 0, 255), # Neon Magenta
30 'skateboard': (255, 215, 0), # Neon Gold
31 'bench': (255, 99, 71), # Neon Tomato
32 'handbag': (0, 255, 127), # Neon Spring Green
33 'suitcase': (173, 255, 47), # Neon Green Yellow
34 'bear': (255, 105, 180), # Neon Pink
35 'chair': (0, 255, 0), # Neon Lime
36 'fire hydrant': (255, 69, 0) # Neon Orange Red
37}
38
39# Load the video
40cap = cv2.VideoCapture(raw_video_path)
41
42# Get the video properties
43frame_width = int(cap.get(cv2.CAP_PROP_FRAME_WIDTH))
44frame_height = int(cap.get(cv2.CAP_PROP_FRAME_HEIGHT))
45fps = int(cap.get(cv2.CAP_PROP_FPS))
46
47# Define the codec and create a VideoWriter object to save the output video
48output_path = 'all_scores_bounding_box_output.mp4'
49fourcc = cv2.VideoWriter_fourcc(*'mp4v') # Codec for .mp4 files
50out = cv2.VideoWriter(output_path, fourcc, fps, (frame_width, frame_height))
51
52thickness = 2 # Thickness of the bounding box lines
53
54while cap.isOpened():
55 # Read the current frame
56 ret, frame = cap.read()
57
58 if not ret:
59 break
60
61 current_frame = int(cap.get(cv2.CAP_PROP_POS_FRAMES))
62
63 df_frame = df_video.filter(pl.col("frame") == current_frame)
64
65 if len(df_frame) > 0:
66 for row_index in range(len(df_frame)):
67 row = df_frame[row_index]
68 top_left = (int(row['x_min'][0]), int(row['y_max'][0]))
69 bottom_right = (int(row['x_max'][0]), int(row['y_min'][0]))
70 color = neon_colors[row['object'][0]]
71
72 # Draw the bounding box on the frame
73 print(top_left, bottom_right, color, thickness)
74 frame_with_box = cv2.rectangle(frame, top_left, bottom_right, color, thickness)
75
76 # Choose the font, size, color, and thickness
77 font = cv2.FONT_HERSHEY_SIMPLEX
78 font_scale = 1 # Font size
79 text = row['object'][0]
80 # Annotate the frame with text
81 cv2.putText(frame_with_box, text, bottom_right, font, font_scale, color, thickness, cv2.LINE_AA)
82 else:
83 frame_with_box = frame
84
85 clear_output(wait=True)
86 plot_frame(frame_with_box)
87
88 # Write the frame with the bounding box to the output video
89 out.write(frame_with_box)
90
91# Release the video capture and writer objects
92cap.release()
93out.release()
94
95print(f"Video saved successfully at {output_path}")

(For faster loading, only 20s of the full 225 MB video is shown above).

Built with